What is Web-hook? How to configure the Web-hook?

Web-hooks is a lightweight HTTP pattern for connecting Web APIs and services with a publish/subscribe model.

Release with CE App 9.0


With Web-hook we can integrate Customer Engagement data with external service.

Web can be invoked from Plugin step or custom workflow activity. 

It can be invoked as Synchronous and Asynchronous.

To secure your endpoint and Authenticate:

  • HttpHeader
  • WebhookKey
  • HttpQueryString

Demo:
Step 1) To create the web hook HTTP endpoint, I have created Power Automate Flow with HTTP Request type trigger.


The HTTP trigger URL generated from this flow is as below:


https://prod-169.westus.logic.azure.com:443/workflows/97d8bb6abcfa4a87b75f0f39adeb32e9/triggers/manual/paths/invoke?api-version=2016-06-01&sp=%2Ftriggers%2Fmanual%2Frun&sv=1.0&sig=1JlyOmHRx9OIRNXTsTT58RGLhITNMJdefruB0V5Q0rE


In this URL %2F means '/'. So, will need to replace it in the URL.
Values obtained from this URL is as below:

End Point UR: https://prod-169.westus.logic.azure.com:443/workflows/97d8bb6abcfa4a87b75f0f39adeb32e9/triggers/manual/paths/invoke

api-version=2016-06-01

sp=/triggers/manual/run

sv=1.0

sig=1JlyOmHRx9OIRNXTsTT58RGLhITNMJdefruB0V5Q0rE


Step 2) Configure the Web in Dynamics 365.
First we need to login into Plugin Registration Tool.

Click on Register -> Register new Web hook

Set the details of Web hook as we have extracted from Power Automate flow HTTP trigger URL.


Step 3) After Web hook is registered, we can registered the Step to trigger the web hook. 
I have configured the Plugin Step on Create message on my custom entity 'dnlb_webhook1'.


Step 4) Once the Plugin step is registered, perform the create operation on custom entity 'dnlb_webhook1'. On create, it will trigger the Power Automate Flow

Trigger event will create the details from entity 'dnlb_webhook1' passed to Power Automate Flow.


Good Luck 😎

How to read the file content when uploaded in file data type in Dynamics 365 field?

 Created new Entity File Upload. Created new field '* Upload' as file data type.


A flow is created which will trigger on Modified event on this entity record.

Design of flow is as below


Design of base64ToString is as below:


After the flow has run the output will be like below:


Webapi Configuration in Power App Portal

Webapi Configuration in Power App Portal

We can test the API in browser.

Example: We want to retrieve the details of entity "dnlb_student", then use below format url.

<portal_url>/_api/dnlb_students

the letter 's' will be appended at the end of entity logical name.


So, it will give error. We need to configure the Web API setting in Site Setting of portal.

To configure it, Go to the Portal Management App and Site Setting.


Create new Site Setting Configuration to enable the Web API on "dnlb_student" entity and fields to be retrieved in result as below.

To Enable the Webapi:

To Enable the Fields:

Here, when we put * in Value then it will retrieve all the fields/columns of entity. 

However we can specify the fields logical name which we want to retrieve by separating them in comma (,).


Now, when we try to access, it gives permission issue.

To fix it, we need to create the table permission for "dnlb_student" entity and associate Web Role to it. Web Role should be the role which is associated to Login Contact user.
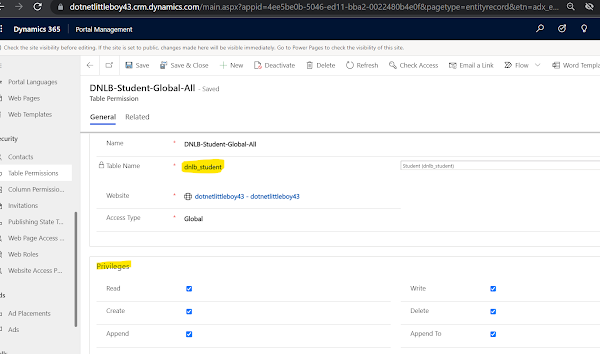
Now try to access the Webapi URI:

It gives the result now. It has all the fields in result.


To get the limited fields in the result, we can configure those fields in Webapi configuration.

Example, we need to get "dnlb_name", "dnlb_firstname", "dnlb_lastname". Then we need to configure the Webapi/dnlb_student/fields values as below:


Now try to access the api:

It gives error because we have specified particular fields in Webapi configuration and trying to retrieve all fields. Since we have not mentioned $select fields in query URI, it fails.

lets specify the fields names in $select in query as below:

It gives result perfectly.


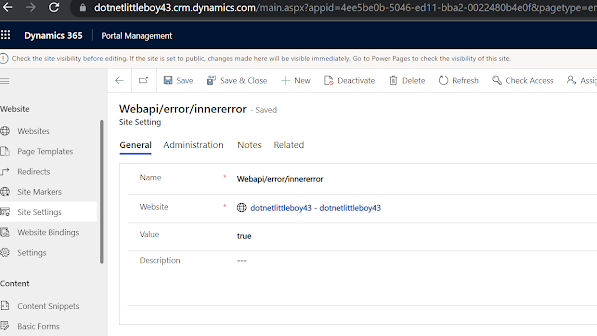
We can also configure the Webapi for inner details of error as below:


Thank you !

Good Day 👏

Featured Posts

Download CRM 365 V9.X Tools using PowerShell

This configuration explains about how to download D365 utility tools step by steps. Step1 : Create a folder in your particular drive where y...

Popular Posts

Contact Me

Name

Email *

Message *