MS CRM Portal : List (Entity List) Configuration
List or Entity List is use to show the list of records in tabular format which are already present in D365. So the list of records in D365 we use view but in Portal it is configured as List.
On the List, we can configure the additional filters based on the fields value.
On the List we can configure the multiple view which can display list of records based on different condition as configured in Dynamics 365. These multiple view first should be configured in D365 so that it can be selected while configuring list in Portal Management. (You can use existing view if any).
These selected multiple view will be available as dropdown as selectable. You can select different view for different condition. At a time only one view will be selected.
Once the list of records are loaded after selecting particular view from dropdown in the table, then we can apply additional filter on the top of loaded table. These options will displays in portal after filter condition are configured.
On the List we can configure lot of things like number row should be displayed each page in table, add buttons, enable for Odata feed etc. Will see these in details below.
Step1 : Create New Entity List:
As I mentioned before, first we need to create views in D365 which I can use to configure List.
Here for demo, I have created an entity Application, which has fields [First Name, Last Name & Is Submitted].
Submitted Active Applications
Not Submitted Active Applications
Now connected to Portal Management App:
Go to List or Entity List to configure the new List.
Name : Enter the name of entity list.
Table Name : select the table (Entity from D365). Here my entity is dnlb_application.
View : Under view, select the application view which we want to display in portal.
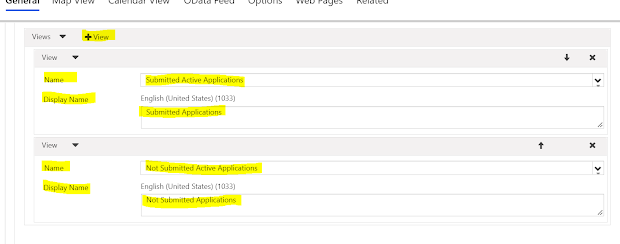
On the view, I am have selected to two view which I have configured in D365 as below.
Use (+View) to add view in list.
The Display Name mentioned will be displayed in portal. If it is not mentioned then view name will be displayed. I have configured two view so two view I will get in dropdown.
Page Size : enter the numeric value. The number of record display in each page of table.
Web Page for Details View : If you click on list then it will open record in form. To identify the record use the parameter with (id).
Web Page for Create : We can add the Create new entity record button also on the List. When you click the button it should load the some create Web Page. That web page you can select in this lookup.
Search : We can enable the Search on the List. It will display one Searchable Text Box when enabled. Enter the display label for search box.
Filter : Enable the filter if we want to add filter options on the display list.
Orientation : It could be Horizontal & Vertical way to display the filter options.
We have different type of filter based on the fields type which we want to use for filter.
I have one field Application Type which is Option Set, so I have use Dynamics Picklist Set filter type to display it.
Attribute : Select the filter attribute.
Selection Mode : it could be Radio list or Drop down list for Picklist Set.
Display Name : Enter display name which will be display on filter attribute.
Tab : Map View : If we want to enable map on List, enable the map view.
Tab : Calendar View : Enable it if you want to enable calendar.
Tab : Odata Feed : List can be use as Odata set. Enable it we want to use List as Odata set.
Tab : Options : Under option tab, enter if any custom JavaScript or jQuery code.
Under Grid Configuration, you can some some button and over ride the column display name.
Step2 : Create Web Page : I have created web page which used List which we configured. For Web Page we need to configure new or user existing the Page Template and Web Template also.
Step 3 : Modify Web Template : Modify the Web Template code to include List (Entity List) which is selected on Web Page.
{% extends "layout_1_column" %}
{% block main %}
{% include 'entity_list' key: page.adx_entitylist.id %}
{% endblock %}
Step 4 : Load Web Page : Try load Web Page which is configured with List (Entity List). You can use Partial URL to access the Web Page.
It will load the list page correctly as below with enabled feature.
Best Of Luck Geeks !!!!! :)


No comments:
Post a Comment
Write us your comment.