Advance Form
There are two types of form available in Power App Portal.
Basic Form : It is used to Edit, Create and Read the data of Single Tabbed Form (Form from Dynamics).
Advance Form: It is like wizard type form, which give functionality similar to Basic Form.
The main difference between Basic Form and Advance Form is that Basic Form is use to collected data from Single Entity Form with Single Tab where as Advance Form is use to collect data from multiple entities and it consist of Advance Form Steps to capture the data from multiple tab and with condition branched on the steps feature.
Both the forms are used in Web Page to render the form in Portal web page.
Lets follow the steps to create the Advance Form and render on Web Page.
First we need to design the Main Forms in Dynamics 365 for the entity which we want to capture the data or display the data in Web Page.
Note: Only Main Form type can be used to create the Advance Form, we can not use Quick View Form, Quick Create Form, Card Form etc.
Example: I have two entities - dnlb_application & dnlb_student.
I have created the main form and design as below for Application Entity. It has only one tab i.e. General tab.
For the another Student Entity, I have created the main form and added three tabs i.e. General, Class Details & Payment Details as below.
So the configuration I have done in Dynamics 365.
Now lets move to he Portal Configuration, go to the Portal Management App.
Then we need to create the Advance Form.
Create new Advance Form:
Name : Enter the name of Advance Form.
Website : Select the website for which creating Advance Form.
Start Step : (Will select it in below when we configure the step).
Authentication Required : Make is Yes if want to make Advance to be authenticated first.
Start New Session on Load : Select Yes if every time when browser window is referesh, in that the session will start with fresh load. If No is selected then window is restart then it will load from previous session.
Scroll down and Enable Progress indicator on the form.
Select the Type : It has three types
- Title : It give name of Advance Form steps which will configure.
- Numeric (Step 1 of N) : It give the number of steps.
- Progress Bar : It gives percent of form complication.
There are some other configuration which can be enabled as required.
Step3: Now will create Advance Form Steps. Go to Advance Form Step tab to add new steps.
I have added two steps, one for the application and another for the Student.
Application Advance Form Step:
Name : Enter the name of step.
Advance Form : Select the Advance Form.
Type : There are five types
- Condition
- Load Form
- Load Tab
- Redirect
- Load User Control
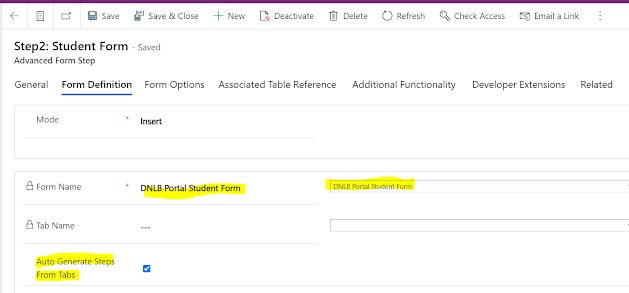
I have selected type as Load Form, so I have selected the form which I have configured in Dynamics. To select the form, go to the form Definition tab.
Note : Entity Permission should be enabled for all type of form for security reason.
I have created the application step for create mode. There are other feature which we can configured as per requirement.
I have selected the form which I have configured in Dynamics, it has three tabs.
I have enabled the Auto Generate Steps from Tab option to automatically the generate the steps for tabs which I have configured on the dynamics form.
Finally the Advance Form Steps will look like below:
Now we have created the Advance Form Steps, let setup the steps.
I have set the Application step as start step as below.
On the Step1, select the next as step2.
On Steps 2, I do not have any steps further so I will keep is blank.
Finally we have configured the Advance Form and Advance Form Steps.
Lets Create Web Page, Page Template & Web Template to render the Advance Form.
Web Template:
Add the code as below in Web Template to include the Advance Form (Which will be selected on Web Page). This code is included because Entity for Advance Form is Web Form.
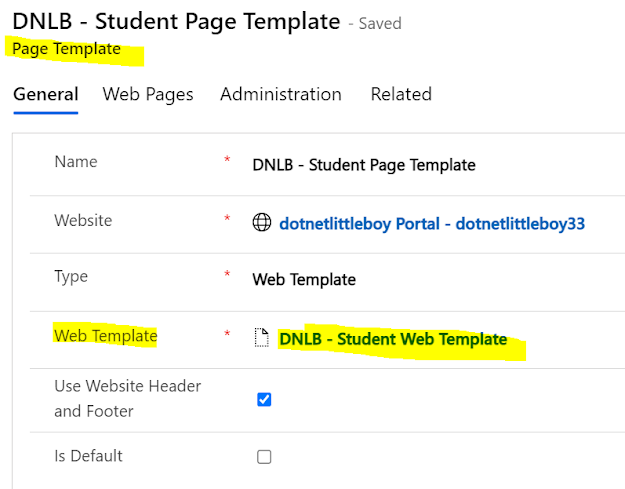
Next, Create Page Template under the Web Template.
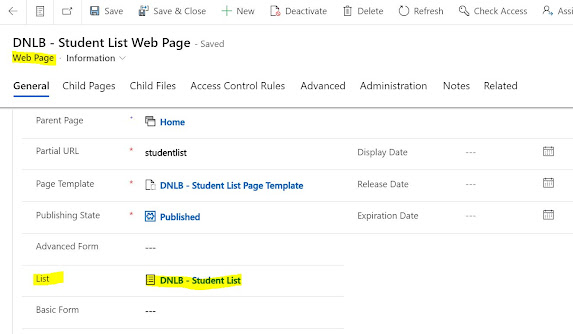
Now Create the Web Page under the Page Template. Select the Advance Form which we created in Web Page.
Verify the same Advance Form is selected on Content Web page also.
Finally, configured the Table Permission and Associated the Permission to Web Role.
The Table Permission is important because all the Forms which we created have Enabled Table Permission. To load the Form we need to provide the access.
I have configured the Table Permission for my both Application and Student Entity as below.
I have associated these Permission to my Web Role.I have associated the Web Role to my Portal Contact user so that when I will login to Portal, I will have access to these Entities to load the form.
Result
Now will login to portal, try to load the Web Page which we configured.
Bingo !!! :)
Web Page has loaded the Advance Form.
Good Luck Guys 😎


