Download CRM 365 V9.X Tools using PowerShell

This configuration explains about how to download D365 utility tools step by steps.

Step1 : Create a folder in your particular drive where you want to download the tools.
Step2 : Open the Power Shell Run, in power shell console, move or change the directory folder to particular folder.


Step3 : Copy and paste the below scripts in that folder directory and press enter.


$sourceNugetExe = "https://dist.nuget.org/win-x86-commandline/latest/nuget.exe"
$targetNugetExe = ".\nuget.exe"
Remove-Item .\Tools -Force -Recurse -ErrorAction Ignore
Invoke-WebRequest $sourceNugetExe -OutFile $targetNugetExe
Set-Alias nuget $targetNugetExe -Scope Global -Verbose
##
##Download Plugin Registration Tool
##
./nuget install Microsoft.CrmSdk.XrmTooling.PluginRegistrationTool -O .\Tools
md .\Tools\PluginRegistration
$prtFolder = Get-ChildItem ./Tools | Where-Object {$_.Name -match 'Microsoft.CrmSdk.XrmTooling.PluginRegistrationTool.'}
move .\Tools\$prtFolder\tools\*.* .\Tools\PluginRegistration
Remove-Item .\Tools\$prtFolder -Force -Recurse
##
##Download CoreTools
##
./nuget install Microsoft.CrmSdk.CoreTools -O .\Tools
md .\Tools\CoreTools
$coreToolsFolder = Get-ChildItem ./Tools | Where-Object {$_.Name -match 'Microsoft.CrmSdk.CoreTools.'}
move .\Tools\$coreToolsFolder\content\bin\coretools\*.* .\Tools\CoreTools
Remove-Item .\Tools\$coreToolsFolder -Force -Recurse
##
##Download Configuration Migration
##
./nuget install Microsoft.CrmSdk.XrmTooling.ConfigurationMigration.Wpf -O .\Tools
md .\Tools\ConfigurationMigration
$configMigFolder = Get-ChildItem ./Tools | Where-Object {$_.Name -match 'Microsoft.CrmSdk.XrmTooling.ConfigurationMigration.Wpf.'}
move .\Tools\$configMigFolder\tools\*.* .\Tools\ConfigurationMigration
Remove-Item .\Tools\$configMigFolder -Force -Recurse
##
##Download Package Deployer
##
./nuget install Microsoft.CrmSdk.XrmTooling.PackageDeployment.WPF -O .\Tools
md .\Tools\PackageDeployment
$pdFolder = Get-ChildItem ./Tools | Where-Object {$_.Name -match 'Microsoft.CrmSdk.XrmTooling.PackageDeployment.Wpf.'}
move .\Tools\$pdFolder\tools\*.* .\Tools\PackageDeployment
Remove-Item .\Tools\$pdFolder -Force -Recurse
##
##Remove NuGet.exe
##
Remove-Item nuget.exe


Step 4 : Once script will be completed then you can see in the folder, new tools folder are created.


GET/SET Value to Different Data Types field in Dynamics 365 using JavaScript

 GET/SET Value to Different Data Types field

Whenever you create function events on Entity's, we pass Execution Context of the form data to the function. We get he form context from Execution Context. Sample Code is as below.

function testFunction(executionContext) {

var formContext = executionContext.getFormContext();

}


Lets check GET/SET for different Data Types, here my prefix of fields schema name is dnlb.

Single Line Text or Multi Line Text

GET

var name = formContext.getAttribute("dnlb_name").getValue(); 

SET

formContext.getAttribute("dnlb_name").setValue("dotNetLittleBoy");


Two Options

GET

var isValid = formContext.getAttribute("dnlb_isvalid").getValue();

SET

formContext.getAttribute("dnlb_isvalid").setValue(true);  


Option Set

GET value

var typecode = formContext.getAttribute("dnlb_typecode").getValue();

GET Text:

var typecodeText = formContext.getAttribute("dnlb_typecode").getText(); 


SET

Set using value

formContext.getAttribute("dnlb_typecode").setValue(99000000);

Set Option set using Text

var text = "TypeA";

var optionSetValues = formContext.getAttribute("dnlb_typecode").getOptions();

for (i = 0; i < optionSetValues.length; i++) {

    if (optionSetValues[i].text == text) {

formContext.getAttribute("dnlb_typecode").setValue(optionSetValues[i].value);

    }

} 


Multi Select Option Set

GET values

var appcodeVal = formContext.getAttribute("dnlb_applicationcode").getValue();

GET Text

var appCodeName = formContext.getAttribute("dnlb_applicationcode").getText();  


SET

Set using value

formContext.getAttribute("dnlb_applicationcode").setValue([990000000,990000001,990000005]);

Set using Text

var commonAppCode=[];

var optionText = ["AppCodeA","AppCodeB","AppCodeC"];

var optionSetValues = formContext.getAttribute("dnlb_applicationcode").getOptions();

for (i = 0; i < optionText.length; i++) {

    for (j = 0; j < optionSetValues.length; j++) {

        if (optionText[i] === optionSetValues[j].text) {

            commonAppCode.push(optionSetValues[j].value);

         formContext.getAttribute("dnlb_applicationcode").setValue(commonAppCode);

        }

    }

} 


Whole Number

GET

var studentAge = formContext.getAttribute("dnlb_studentAge").getValue();

SET

formContext.getAttribute("dnlb_studentAge").setValue(25); 


Decimal Number

GET

var testdn = formContext.getAttribute("dnlb_test").getValue(); 

SET

formContext.getAttribute("dnlb_test").setValue(40.6); 


Floating Point Number

GET

var testfn= formContext.getAttribute("dnlb_testfn").getValue();

SET

formContext.getAttribute("dnlb_testfn").setValue(0.00009); 


Date

GET

var dob = formContext.getAttribute("dnlb_dobdate").getValue();

SET

formContext.getAttribute("dnlb_dobdate").setValue(d); //d value should be in utc format based on date type as Date Only or Date Time both.


Currency

GET

var amount = formContext.getAttribute("dnlb_totalAmount").getValue(); 

SET

formContext.getAttribute("dnlb_totalAmount").setValue(176.98); 


Lookup or Customer

GET

var studentGuid = formContext.getAttribute("dnlb_studentId").getValue()[0].id;  

var studentEntityType = formContext.getAttribute("dnlb_studentId").getValue()[0].entityType;

var studentName = formContext.getAttribute("dnlb_studentId").getValue()[0].name;

SET

var studentLookup = new Array()

studentLookup[0]= new Object();

studentLookup[0].id = "{{RECORD_ID_WHICH_TO_BE_SET}}";  

studentLookup[0].entityType = "dnlb_student";            

studentLookup[0].name = "dotNetLittleBoy";

formContext.getAttribute("dnlb_studentId").setValue(studentLookup); 


Happy Coding !!!


How to get the current Environment URL in Canvas App or Custom Page?

 To get the Current Environment in canvas app,we can perform the following step:


Step 1: Include Canvas App data source in app and connector PowerAppForMakers as below screenshot.


Step 2: Set the below variable on load or particular event of the screen. 

the variable varCurrentEvironmentURL will store the environment url.

Set(currentAppURI, First('Canvas Apps').AppOpenUri);

Set(currentEvmtId, Right((Match(currentAppURI,"/e/.*(?=/a)").FullMatch),36));

ClearCollect(
    collAllEnvironments,
    AddColumns(
        Sort(
            PowerAppsforMakers.GetEnvironments().value,
            DataSourceInfo.DisplayName
        ),
        "DisplayName",
        properties.linkedEnvironmentMetadata.friendlyName,
        "Url",
        properties.linkedEnvironmentMetadata.instanceUrl
    )
);


Set(
    currentEnvironmentURL,
    First(
        Filter(
            collAllEnvironments,
            currentEvmtId in id
        )
    ).Url
);


What is Web-hook? How to configure the Web-hook?

Web-hooks is a lightweight HTTP pattern for connecting Web APIs and services with a publish/subscribe model.

Release with CE App 9.0


With Web-hook we can integrate Customer Engagement data with external service.

Web can be invoked from Plugin step or custom workflow activity. 

It can be invoked as Synchronous and Asynchronous.

To secure your endpoint and Authenticate:

  • HttpHeader
  • WebhookKey
  • HttpQueryString

Demo:
Step 1) To create the web hook HTTP endpoint, I have created Power Automate Flow with HTTP Request type trigger.


The HTTP trigger URL generated from this flow is as below:


https://prod-169.westus.logic.azure.com:443/workflows/97d8bb6abcfa4a87b75f0f39adeb32e9/triggers/manual/paths/invoke?api-version=2016-06-01&sp=%2Ftriggers%2Fmanual%2Frun&sv=1.0&sig=1JlyOmHRx9OIRNXTsTT58RGLhITNMJdefruB0V5Q0rE


In this URL %2F means '/'. So, will need to replace it in the URL.
Values obtained from this URL is as below:

End Point UR: https://prod-169.westus.logic.azure.com:443/workflows/97d8bb6abcfa4a87b75f0f39adeb32e9/triggers/manual/paths/invoke

api-version=2016-06-01

sp=/triggers/manual/run

sv=1.0

sig=1JlyOmHRx9OIRNXTsTT58RGLhITNMJdefruB0V5Q0rE


Step 2) Configure the Web in Dynamics 365.
First we need to login into Plugin Registration Tool.

Click on Register -> Register new Web hook

Set the details of Web hook as we have extracted from Power Automate flow HTTP trigger URL.


Step 3) After Web hook is registered, we can registered the Step to trigger the web hook. 
I have configured the Plugin Step on Create message on my custom entity 'dnlb_webhook1'.


Step 4) Once the Plugin step is registered, perform the create operation on custom entity 'dnlb_webhook1'. On create, it will trigger the Power Automate Flow

Trigger event will create the details from entity 'dnlb_webhook1' passed to Power Automate Flow.


Good Luck 😎

How to read the file content when uploaded in file data type in Dynamics 365 field?

 Created new Entity File Upload. Created new field '* Upload' as file data type.


A flow is created which will trigger on Modified event on this entity record.

Design of flow is as below


Design of base64ToString is as below:


After the flow has run the output will be like below:


Webapi Configuration in Power App Portal

Webapi Configuration in Power App Portal

We can test the API in browser.

Example: We want to retrieve the details of entity "dnlb_student", then use below format url.

<portal_url>/_api/dnlb_students

the letter 's' will be appended at the end of entity logical name.


So, it will give error. We need to configure the Web API setting in Site Setting of portal.

To configure it, Go to the Portal Management App and Site Setting.


Create new Site Setting Configuration to enable the Web API on "dnlb_student" entity and fields to be retrieved in result as below.

To Enable the Webapi:

To Enable the Fields:

Here, when we put * in Value then it will retrieve all the fields/columns of entity. 

However we can specify the fields logical name which we want to retrieve by separating them in comma (,).


Now, when we try to access, it gives permission issue.

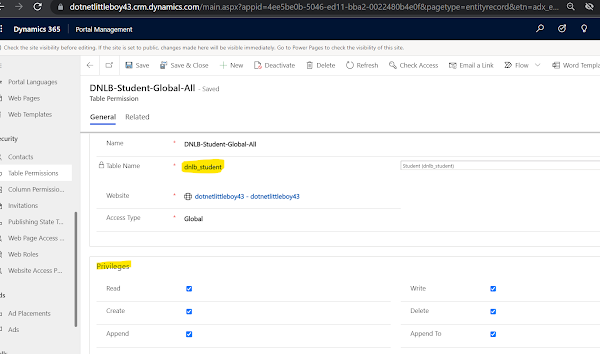
To fix it, we need to create the table permission for "dnlb_student" entity and associate Web Role to it. Web Role should be the role which is associated to Login Contact user.

Now try to access the Webapi URI:

It gives the result now. It has all the fields in result.


To get the limited fields in the result, we can configure those fields in Webapi configuration.

Example, we need to get "dnlb_name", "dnlb_firstname", "dnlb_lastname". Then we need to configure the Webapi/dnlb_student/fields values as below:


Now try to access the api:

It gives error because we have specified particular fields in Webapi configuration and trying to retrieve all fields. Since we have not mentioned $select fields in query URI, it fails.

lets specify the fields names in $select in query as below:

It gives result perfectly.


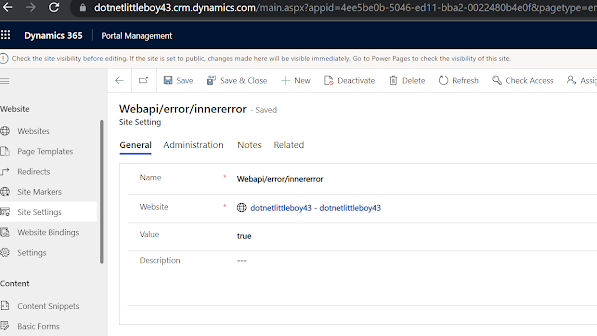
We can also configure the Webapi for inner details of error as below:


Thank you !

Good Day 👏

Use code of Web file in Basic forms or Advance Forms steps scripts.

Web files are used to add some additional components to Portal. It is just like adding the attachment using Notes. Web files are reference by partial URL specified. We can configured web file for Particular web page or home page. When it is at home page then it can be reference directly as below in Web Template. Since home page will have '/' as partial URL.

<script src="/mytestscripts.js"></script>
 
The other web page which is configured it will be configured as child/under Home page. 

Take an Example, we have configured webpage with partial URL as 'test-page' & its parent is home page. We have configured JavaScript Web file which is having partial URL as 'test-page-logic.js'. While configuring web file, we have webpage which was having this 'test-page' partial URL.

Web file can be reference test-page-logic.js file in test-page web template as below.

<script src="/test-page/test-page-logic.js"></script>
 
Consuming web file on Web template is direct by using partial URL.
 

Sometime we will have web file which is having common kind of function we want to use in different places. Using in Web template is directly by linking the file.
But to use in Basic form or Advance form steps custom JavaScript logic is bit different. 
We can not directly link using HTML <script> tag.

Take an example, I have web file 'test-common-logic.js' file. It has some common variable/function as below:
 
var someVariable = "someValue";
function doSomething() {
    console.log("Perform something");
}

 
I want to use some of the function/variable of this file in Basic Form.

To use this, we need to load the function written in 'test-common-logic.js' file.
And to load, we need fetch text which will be nothing but our logical code. Append this text inside the head tag of HTML. We can push JavaScript code text when document gets ready as below.
 
 
$(document).ready(function(){
    fetch("/
test-common-logic.js")
      .then(res => res.text())
      .then(jsCode => {
        var jsElement = document.createElement("script");
        jsElement.textContent = jsCode;

        //append the jscode under in head tag of loaded html
        document.head.appendChild(jsElement);
        
        //once code is added in head, we can use components from that.
        var x = someVariable;
        doSomething();
    });
});


Different Way to Open Edit Form Web Page from Entity List in Power App Portal

Open Web Page From Entity List In this blog post

I will show you three different way to open particular Web Page from Entity List (table display in portal).

To display the list of records in tabular grid, you would must have configured List or Entity List.
Entity List must be selected on Web Page to display the records.

We need to modify the entity list or list to get open the Edit Web Page. To open the record in Edit Page or Read Page, we need the Id (It is D365 record id) of the record. 
So for that we must select the web page and append the target URL with Id. 
We have different way of doing it. 
Lets take a look on different way.

1)    On the List or Entity List, under General Tab, we need to select the your edit web page.
Select  web page in Web Page for Details View field. You can see id is selected in ID Query String Parameter Name field. If you want to add some text to display button, you can the button display text in Details Button Label field.

2)    In List or Entity List, go to Option tab and add Item Action. We can use Details & Edit action to redirect on particular Web Page.
Select the Target Type as Web Page. 
Select the Redirect to Web Page as your particular Web Web which you want to open from table.
Enter the button display name in Button Label.

3)     Another way is to bind the hyperlink on each record of table. To do that add below code in List or Entity List under Option tab, there custom JavaScript area.
When DOM module is ready, it will execute the logic.
Find the entity list grid element by class (entitylist.entity-grid) and when it is loaded then execute the logic.
For all the Children element of entity list grid, find the field on which you want to make hyperlink. Here in code I have added on dnlb_name field. 
Get the record id using attribute data-id.
Add wrapInner function and hardcode the URL you want to open.

$(document).ready(function(){
$(".entitylist.entity-grid").on("loaded",function(){
$(this).children(".view-grid").find("td[data-attribute='dnlb_name']").each(function(){
var studentId = $(this).parent().attr("data-id");
$(this).wrapInner("<a href=\"/studentlist/editstudent/?id="+studentId+"\"</a>");
});
});
});


Good Luck Geeks 😎

MS CRM Portal : What is Advance Form and How to Configure it?

Advance Form

There are two types of form available in Power App Portal.
  • Basic Form
  • Advance Form

Basic Form : It is used to Edit, Create and Read the data of Single Tabbed Form (Form from Dynamics).
Advance Form: It is like wizard type form, which give functionality similar to Basic Form.

The main difference between Basic Form and Advance Form is that Basic Form is use to collected data from Single Entity Form with Single Tab where as Advance Form is use to collect data from multiple entities and it consist of Advance Form Steps to capture the data from multiple tab and with condition branched on the steps feature.

Both the forms are used in Web Page to render the form in Portal web page.

Lets follow the steps to create the Advance Form and render on Web Page.

First we need to design the Main Forms in Dynamics 365 for the entity which we want to capture the data or display the data in Web Page.


Note: Only Main Form type can be used to create the Advance Form, we can not use Quick View Form, Quick Create Form, Card Form etc.

Example: I have two entities - dnlb_application & dnlb_student.
I have created the main form and design as below for Application Entity. It has only one tab i.e. General tab.
For the another Student Entity, I have created the main form and added three tabs i.e. General, Class Details & Payment Details as below.
So the configuration I have done in Dynamics 365.
Now lets move to he Portal Configuration, go to the Portal Management App.

Then we need to create the Advance Form. 

Create new Advance Form:
Name : Enter the name of Advance Form.
Website : Select the website for which creating Advance Form.
Start Step : (Will select it in below when we configure the step).
Authentication Required : Make is Yes if want to make Advance to be authenticated first.
Start New Session on Load : Select Yes if every time when browser window is referesh, in that the session will start with fresh load. If No is selected then window is restart then it will load from previous session.
Scroll down and Enable Progress indicator on the form.
Select the Type : It has three types 
  • Title : It give name of Advance Form steps which will configure.
  • Numeric (Step 1 of N) : It give the number of steps.
  • Progress Bar : It gives percent of form complication.
There are some other configuration which can be enabled as required.

Step3: Now will create Advance Form Steps. Go to Advance Form Step tab to add new steps.
I have added two steps, one for the application and another for the Student.
Application Advance Form Step:
Name : Enter the name of step.
Advance Form : Select the Advance Form.
Type : There are five types
  • Condition
  • Load Form
  • Load Tab
  • Redirect
  • Load User Control 
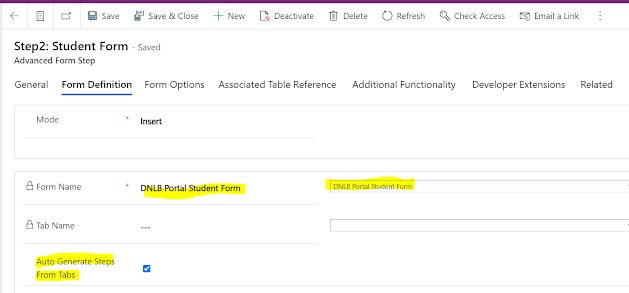
I have selected type as Load Form, so I have selected the form which I have configured in Dynamics. To select the form, go to the form Definition tab.
Note : Entity Permission should be enabled for all type of form for security reason.
I have created the application step for create mode. There are other feature which we can configured as per requirement.
I have selected the form which I have configured in Dynamics, it has three tabs. 
I have enabled the Auto Generate Steps from Tab option to automatically the generate the steps for tabs which I have configured on the dynamics form.

Finally the Advance Form Steps will look like below:

Now we have created the Advance Form Steps, let setup the steps.
I have set the Application step as start step as below.

On the Step1, select the next as step2.
On Steps 2, I do not have any steps further so I will keep is blank.


Finally we have configured the Advance Form and Advance Form Steps.

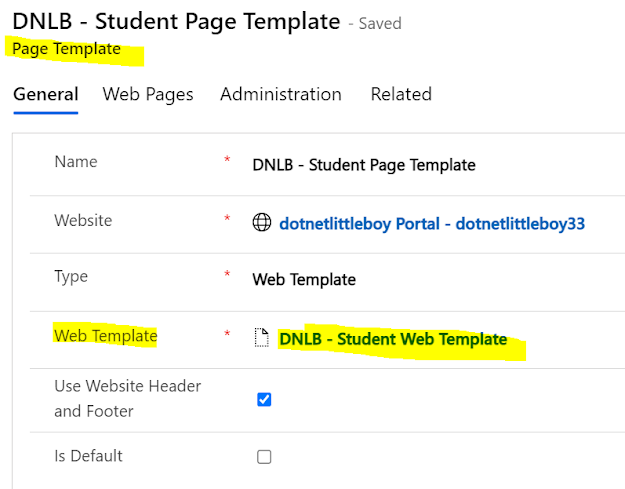
Lets Create Web Page, Page Template & Web Template to render the Advance Form.

Web Template:
Add the code as below in Web Template to include the Advance Form (Which will be selected on Web Page). This code is included because Entity for Advance Form is Web Form.
Next, Create Page Template under the Web Template.
Now Create the Web Page under the Page Template. Select the Advance Form which we created in Web Page. 
Verify the same Advance Form is selected on Content Web page also.

Finally, configured the Table Permission and Associated the Permission to Web Role.

The Table Permission is important because all the Forms which we created have Enabled Table Permission. To load the Form we need to provide the access.

I have configured the Table Permission for my both Application and Student Entity as below.

I have associated these Permission to my Web Role.
I have associated the Web Role to my Portal Contact user so that when I will login to Portal, I will have access to these Entities to load the form.


Result

Now will login to portal, try to load the Web Page which we configured.
Bingo !!! :) 
Web Page has loaded the Advance Form.


Good Luck Guys 😎

Featured Posts

Download CRM 365 V9.X Tools using PowerShell

This configuration explains about how to download D365 utility tools step by steps. Step1 : Create a folder in your particular drive where y...

Popular Posts

Contact Me

Name

Email *

Message *