What is Site Marker and How to use Site Marker?

MS CRM Portal : What is Site Marker and How to use Site Marker?

If you ask what is Site Marker?
Answer would be very simple, it use to avoid the hard code URL of web pages in portal development.

Take a scenario where we can use the Site Marker.
You have some custom button on Web Page. On the click of this button, you want to open some Web Page in new tab.

To open the Web Page in new tab, you need the URL of the Web Page so that you can use href tag to open it new tab. If you know then you can directly hardcode the URL in code. Which is not the correct way to do.

To avoid such coding of hardcode URL you need to configure the Site Marker.
So, basically Site Marker hold the URL of Web Page and it will give you URL of your Web Page selected on the Site Marker Configuration.

The URL can be retrieve using the Liquid Script as below.
{% assign siteMarkerURL = sitemarkers['Site Marker Name'].url %}
To show you with demo:
Let me tell you the setup I have configured.
First I have create the Web Template and Page Template as below.
Under the Page Template, I have created two Web Page as below. 

On the Web Template code area, I have added custom button. On click of this button I want to open my DNLB - Site Marker Web Page. 
The button which is added through code will display on Web Page as below. I have open DNLB - Application Create Web Page on portal.
On Click of Open Site Marker button, I want to open DNLB - Site Marker Web Page.

I hope now you have understood the setup.

Lets configure the Site Marker.
Go to Portal Management App and select Site Marker on left navigation.
Create new Site Marker.
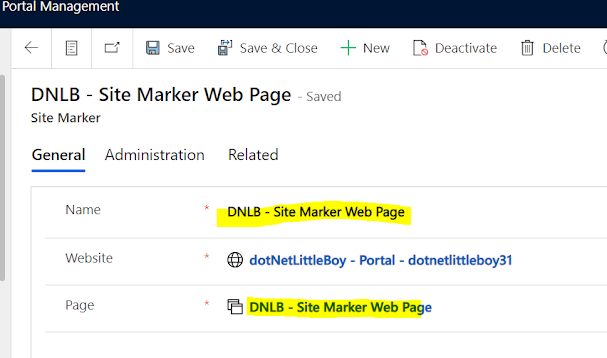
Name : Enter the name of Site Marker. Through this name you can access the Site Marker in Liquid Code.
Website : Select the website for which you are creating the Site Marker.
Page : Select the Web Page for which you want to use the URL. (I have selected DNLB - Site Marker Web Page as I need the URL in code.)


Now lets modify the Web Template code where we have to register the function on click of custom button.
I have added below code to retrieve the URL of selected Web Page (DNLB - Site Marker Web Page).
{% assign siteMarkerPage = sitemarkers['DNLB - Site Marker Web Page'].url %}

As code as below when DOM module gets ready then bind the function on click.


{% assign siteMarkerPage = sitemarkers['DNLB - Site Marker Web Page'].url %}
<script>
var SiteMarkerButton = $("<input type='button' id='btnSiteMarker'
    value='Open Site Marker' style='float:right' class='btn btn-primary' />");
$(".page-header").before(SiteMarkerButton);
$(document).ready(function(){
$("#btnSiteMarker").on("click",function(){
window.open("{{%siteMarkerPage%}}","_blank");
});
});
</script>


Open the Web Page where custom button is present. Click on Custom button.
Bingo !!! New Tab is loaded with page of Site Marker as configured.

This is how you can use the Site Marker in your Portal development.


Stay Safe and Best of Luck !!! 😎

How to use JavaScript Web File in Portal?

How to use JavaScript Web File in Portal?

Web file use to store images, .json type file, .js type file, documents and other file types. These attached files can be downloaded. 

When the files are attached, it is accessible by code written in Web Template, Page Template or other codes.

When you go to the portal, you will find already some web files added to portal. The file like bootstrap.js, bootstrap.min.css (used for responsive portal website), banner image, home page logo etc. These web files are used to build the default Portals. 

To store the actual content of file, portal uses attachment feature of notes associated with a web file record. When files are attached, it has limitation of size it supports to upload based on type of files are being attached. 


In this post will see in details about how to use JavaScript as Web File in Power App portal?

I will show you steps how to use JavaScript or jQuery code written in .js Web File can be use in Web Page through Web Template.

Let's see step by step.

Scenario: I have one Web Page (Partial URL as create-application) which contains a Submit button with id InsertButton. On click of this button, I want to show confirm dialog. The code of logic will be written in .js Web File.


Step1: create your .js file which contains your code of logic. 

Yea, you are right !. Code is pretty simple. When DOM module becomes ready my code loads and register on click event function which shows confirm dialog when Submit (i.e. InsertButton) is clicked.

Save the file of code with extension (.js) in your local system. This file we need to upload to the Web File in Portal.

Step2: before you upload any file extension to D365, you need to remove restriction. By default D365 restrict some file type and .js type is one of it. 

To remove go to Advance Setting - > Administration - > System Setting.

Remove the js from the list of Set blocked file extension for attachments.

Step3: Now go to the Portal Management App and select Web File. Under the Web File, create new Web File. I have already created a Web File with partial URL dnlb_application.js as below.

Name : Enter the name of the Web File.

Website : Select the web site portal for which you are creating web file.

Parent Page : You can select home if you want web file to accessible from home page. You can create the web files for specific pages then you need to the specific page as parent page.

Partial URL : Partial URL is important. Through Partial URL you can access the Web Files. Enter the partial URL text.

Published State : Select published state as Published.

Title : You can specify the title through which you can see the Web File in XrmToolBox and all.


Step4: Once the Web File record is created then go to Notes tab of Web File. Add .js file as attachment which you created and contain code of your logic.

I have attached my saved file as below.

Now the content of notes which we attached can be access through Partial URL.

Step5: To check if it is correctly uploaded, get the portal URL and append the partial URL in the web site URL.

Example: If my Portal Website URL is https://xyz.powerappsportal.com/ then append the partial URL as https://xyz.powerappsportal.com/partialurl. In below image you can I have append my Web File Partial URL as dnlb_application.js. You can see the code written in the attached file. If content load correctly then you successfully uploaded the file.

Step6: Now to use the code of .js Web File in Web Page, you can include this .js Web File in Web Template or Page Template as below.

When you include your web file to Web Template then it can access variable or function which are present in Web Template also.

I have already created Web Template file to load the Web Page. I have placed code as below to include the my Web File with Partial URL dnlb_application.js.

Step7: Now save the Web Template and go to Web Page and try to Click on Submit button.

Bingo !! I got my confirm alert as coded in .js file.

This is how you can use the Web File to your Portal.


Stay Safe and Good Luck !

List (Entity List) Configuration

MS CRM Portal : List (Entity List) Configuration

List or Entity List is use to show the list of records in tabular format which are already present in D365. So the list of records in D365 we use view but in Portal it is configured as List.

On the List, we can configure the additional filters based on the fields value.

On the List we can configure the multiple view which can display list of records based on different condition as configured in Dynamics 365. These multiple view first should be configured in D365 so that it can be selected while configuring list in Portal Management. (You can use existing view if any).
These selected multiple view will be available as dropdown as selectable. You can select different view for different condition. At a time only one view will be selected.

Once the list of records are loaded after selecting particular view from dropdown in the table, then we can apply additional filter on the top of loaded table. These options will displays in portal after filter condition are configured.

On the List we can configure lot of things like number row should be displayed each page in table, add buttons, enable for Odata feed etc. Will see these in details below.

Step1 : Create New Entity List:
As I mentioned before, first we need to create views in D365 which I can use to configure List.

Here for demo, I have created an entity Application, which has fields [First Name, Last Name & Is Submitted].
    Submitted Active Applications 
    Not Submitted Active Applications

Now connected to Portal Management App:
Go to List or Entity List to configure the new List.
Name : Enter the name of entity list.
Table Name : select the table (Entity from D365). Here my entity is dnlb_application.
View : Under view, select the application view which we want to display in portal.

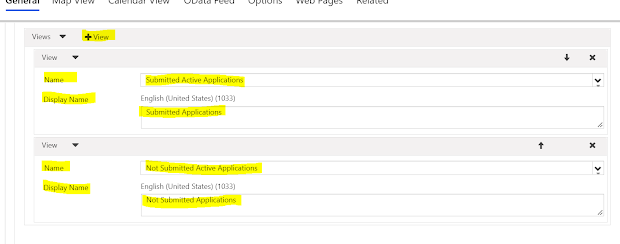
On the view, I am have selected to two view which I have configured in D365 as below.
Use (+View) to add view in list.
The Display Name mentioned will be displayed in portal. If it is not mentioned then view name will be displayed. I have configured two view so two view I will get in dropdown.
Page Size : enter the numeric value. The number of record display in each page of table.
Web Page for Details View : If you click on list then it will open record in form. To identify the record use the parameter with (id).

Web Page for Create : We can add the Create new entity record button also on the List. When you click the button it should load the some create Web Page. That web page you can select in this lookup.

Enable Table Permission : It is important. Check it if we want to secure the record which will be retrieved by the views by user privilege. If it is unchecked then record will be retrieved without authentication. This property going to be deprecated soon.

Search : We can enable the Search on the List. It will display one Searchable Text Box when enabled. Enter the display label for search box.

Filter : Enable the filter if we want to add filter options on the display list.
Orientation : It could be Horizontal & Vertical way to display the filter options.

We have different type of filter based on the fields type which we want to use for filter. 
I have one field Application Type which is Option Set, so I have use Dynamics Picklist Set filter type to display it.
Attribute : Select the filter attribute. 
Selection Mode : it could be Radio list or Drop down list for Picklist Set.
Display Name : Enter display name which will be display on filter attribute.

Tab : Map View : If we want to enable map on List, enable the map view.
Tab : Calendar View : Enable it if you want to enable calendar.
Tab : Odata Feed : List can be use as Odata set. Enable it we want to use List as Odata set.
Tab : Options : Under option tab, enter if any custom JavaScript or jQuery code.
Under Grid Configuration, you can some some button and over ride the column display name.


Step2 : Create Web Page : I have created web page which used List which we configured. For Web Page we need to configure new or user existing the Page Template and Web Template also.

Step 3 : Modify Web Template : Modify the Web Template code to include List (Entity List) which is selected on Web Page.

{% extends "layout_1_column" %}
{% block main %}
{% include 'entity_list' key: page.adx_entitylist.id %}
{% endblock %}

Step 4 : Load Web Page : Try load Web Page which is configured with List (Entity List). You can use Partial URL to access the Web Page.
It will load the list page correctly as below with enabled feature.

Best Of Luck Geeks !!!!! :)

Basic Form (Entity Form) Configuration

MS CRM Portal : Basic Form (Entity Form) Configuration

Basic Form (Table Form) use to collect data from end user on Portal. The User Interface form is display on Portal to collect the data is configured in D365. The fields from D365 entity will be displayed on Web Page with help of configuration of Basic Form. To configure the Basic Form, a Main form must be configure in D365. 

For the configuration of Basic form only Main form of entity can be used. We can not create Basic form using Quick Create Form or Quick View form or Card form. It should be only Main form.

Basic form allow portal end user to Read, Create, Update or Delete the records of Dynamics entities. 

Basic form has relationship with Web Page through which Web Page allow to retrieve the form definition of Basic form and display the from on Portal. 

The reason to use Basic form is to perform operation like Read-only, Insert, Update or Delete etc. It can also use to capture the one-page information.
One - Page Feedback
One - Page Contact us
One - Page Information

Create Basic Form:
Before we create Basic Form in Portal Management App, we need to create one Main Form in D365.
I have created a Main form in Dynamics for Entity Application with name DNLB - Application Create Form.
The field layout on the form is as below. I have created field Application, First Name & Last Name. Make sure you form is published to effect the form the layout changes.

I have created a Basic Form in Portal Management App as below. 
Name : Enter the name of Basic Form
Table Name: It is Entity logical name from D365. Here I have selected for Application Entity.
Entity Form: You will get all list of Main form configure in your entity. Select the particular form which is design. I have selected DNLB - Application Create Form as designed.
Tab Name: It is optional, if we want to display field view only for particular tab in form then select the particular tab.
Mode: Basic Form will be created with three mode
  • Insert 
  • Edit
  • ReadOnly
Insert is selected to create Basic Form for Create mode.
Edit is use to display the Basic form for Editing the value.
ReadOnly is use when we do not want user to edit any information but they can just see the values. 
Website: Select the website (portal) for which you are creating the Basic Form.
Enable Table Permission: It is Boolean field. It is going to deprecate soon. It is used to secure the visibility of Basic Form on the Web Page. You need to create a table permission to allow the accessibility. 

On the Form Option tab, we get some more option to add feature on the form like enable the captcha on the form, Enable Validation, etc.

On Success Setting tab, we get two option on Success.
  • Display Success Message
  • Redirect
Display Success Message: It is default selected. When Basic Form successfully submitted then it display popup message of success submission.
Redirect: When it is selected then we need to set the redirect URL or Web Page which will be display when Basic form is successfully summited.

On Additional Setting, we can add some more control on Basic Form like attach file feature, buttons, Associate Current Portal User on Insert, Geolocation, Custom JavaScript etc. It give high degree of configuration on Basic Form.
Basic Form Meta Data is use to configure for field type like Attribute, Sub-grid, Section, Notes, Tab & Timeline.

Configure Web Page: Now we can configure the web page using the Basic Form as below. I have configure the Application Create Web Page with partial URL create-application.

On the Web Template which is used in Web Page, include below code snippet to include the Basic Form.

{% extends "layout_1_column" %}
{% block main %}
{% entityform id:page.adx_entityform.id %}

{% endblock %}

Since I have checked Enable Table Permission on the form, I need to create the Table Permission. I have created as below. 
I have create a Web Role also and associated this Entity Permission to the Web Role. That Web Role I have associated to the Portal User. Now portal user is having access to this entity through the Web Role.

If Table Permission is not created the will get error as below.

When everything is configured correctly and then try to access the web page (create-application), Basic Form will be loaded correctly as below.


Web Page Configuration

MS CRM Portal : Web Page Configuration

Web Page is use to display the content of website. It represents URL in Portal. It is represented with logical name adx_webpage.

In development of Portal, we can create Entity List (Display the records in table), Entity Form (Display entity form view layout) and Web Form (To display the HTML Page). All these components are consumed by Web Page. So Web page is kind of gateway to view the contents of Portal.


In Portal development we can think Dynamics 365 basically as Database and MS Portal provides extensibility to design the Front End and Middle Tier of website type design. 

While designing the front end we use the combination of Web Template, Page Template and Web Page. The Web Page uses the other component like Entity Form, Entity List etc. from D365 entities to extends the D365 features.

The middle tier can be design as coding part of Web Template, Web file etc. On the web template we code Liquid Scripts to fetch data form D365 Database. The output logic from code will be viewed on Web Pages.

Web Page can have Parent and Child Web Page hierarchy like under Home page we can have another child page. (Home - > Child Page). It is also the basis of other portal entities such as blogs, forum, shortcuts and web files.

Create New Web Page:
Name : Enter the name of the web page.
Website: Select the web site for which web page is being created.
Parent Page: Select another web page under which this web page should be displaying. Example: I am creating web page with partial URL 'create-application' and parent page is Home page then web page URL will be formed as below.
Partial URL : Enter the partial URL by which this web page will be retrieved.
Page Template: Select the Page Template under which if any coding can be updated. Page Template will have parent Web Template where liquid script or custom code will be placed.
Advance Form: If we want to display and any advance form (forms with the steps in web page) then select the Advance form.
List: If we want to display the any Entity List or List of records in table form then we configure the entity and that entity we need to select on the web page.
Basic Form: If we want to display the layout of fields from Entity D364 forms then we configure the Basic Form (Entity Form) and that form we need to select in the web page.

These are the important field which need to be filled while creating new Web Page. There are some fields too it can field based on details provided.

An Example of Web Page configuration is as below:

Web Page consist of two form type. 
  • Information 
  • Localized Content

Information Form Web Page will be kind of root page. There is one Boolean field with name like 'Is Root'. It will be marked as Yes(True) to indicate the page is Information page and if it No(False) which means the page is Content page.

Localized Content page is actual Web Page which will be loaded on Portal website. So if Portal is configure for only English language then one English Language content web page will be automatically created. 
If we have portal configured with multi-language supported then we need to create the Localized Contend web page of each language (Language enabled in Portal). 

If portal is not configured the Localized Content web page then when we navigate the Portal with another language (for which localized content page is not created) then nothing will be loaded since localized content page will not be found to display the contents or information.
So it is important to check the Localized Contend page for each language enabled in Portal.

Configuration of Localized Contend page is similar to Information page but we can set the Language of Content page, Title (It is kind of page header). If we have any custom HTML, CSS, JS code those can be placed in code area (Designer/HTML).


There are some other main configuration which can be enabled on Web Page for more user interactive feature like Rating option, Search options etc.


Featured Posts

Download CRM 365 V9.X Tools using PowerShell

This configuration explains about how to download D365 utility tools step by steps. Step1 : Create a folder in your particular drive where y...

Popular Posts

Contact Me

Name

Email *

Message *