Web Template Configuration

MS CRM Portal : Web Template Configuration

Most of the portal development revolve around designing Web Page. Web Page can display Basic Form (Entity Form), Table List (Entity List) or Web Form. We can user custom HTML custom code also for Web Page.

To develop the Web Page, it require Page Template and to create Page Template it required Web Template. So Web Template is top tier content records in Dynamics Portal. It can support the selected HTML, JS, CSS and Liquid Code. Once Web Template is created, it can process the code and results output to all the web page which are created using the Web Template.

Liquid code is use to retrieve the dynamics code from within the CRM database using selected tags.

Create Web Template:
Name: Enter the name of Web Template.
Website: Select the website for which Web Template is being created.
Source: Under the source area we place code which includes HTML, CSS, JS and Liquid Code.

When we create Page Template, we get type as two option:
  • Rewrite
  • Web Template

When Web Template is selected then we must select Web Template. This is how Web Template is used consumed in Page Template.


Portal Deployment using XrmToolBox

MS CRM Portal : Deployment

When we develop portal we configure lot of records. Configuration may involve creating lots of Web Template, Page Template, Web Page, Basic Form (Entity Form), Web Roles, Table Permission (Entity Permission), Web Files etc.

When we deploy the portal to another environment, then we need to move these configuration record to target environment. 

For the deployment, we can use different tools. Mostly portal deployment involved movement of configuration records.

Most of the time, we user XrmToolBox for the development and deployment. XrmToolBox give lots of plugins for development and deployment activity.

In this post I will be discussing the deployment activity using XrmToolBox plugin.

XrmToolBox Setup:

You can download the XrmToolBox from below link:

Once downloaded, extract the zip file and launch the XrmToolBox.

Now in XrmToolBox will try to install the two plugin which can be use for deployment.
Go to Configuration - > Tool Library.


Now in Tool Library, under category select Portal. It will display portal related plugin. Select below two plugin to install in XrmToolBox.
  • Portal Configuration Deployer
  • Portal Record Mover

Once these two plugins are install then Connect XrmToolBox with source environment of D365 from which will move the portal configuration to target.
Click on SDK Login Control.

Click on Open SDK Login Control

In login pop up, select Office 365, select check box Display list of available organization and Show Advance. Enter the username and password to login with D365. Once successfully connected we can see connected environment name at the bottom of XrmToolBox.

Deployment:

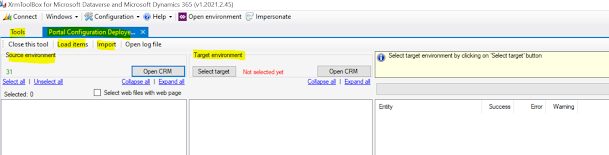
Now to perform the deployment, search Portal Configuration Deployer in tools tabs. Connect to Portal Configuration Deployer as below.
Connect to Target Environment also then click on Load Items to display configuration entity items.
From source the source select the configuration items which we want to deploy into target. After selection click on Import to move the selected items into target environment.
This tool is easy to user and it align the environment. However there is limitation that all Portal components are not available for deployment like Table Permission (Entity Permission) is missing.

To do those deployment we can user another XrmToolBox plugin i.e. Portal Record Mover.
To use Portal Record Mover, connect the XrmToolBox with Portal Record Mover plugin as below.
Click on Load Items to select the Portal configuration items. Select the items which we want to deploy from source. Then click on Retrieve Records. From retrieved records we can filter the records based on created on, modified on, portal etc. 
Example I want to deploy Table Permission, I have selected Table Permission on left side navigation and clicked on Retrieve Records. All table permission is displaying. I will select All or any specific Table Permission from list and click on Export Record to export the selected Table Permission in .xml package. This export .xml package will be used to import the file in after connecting XrmToolBox with target environment.
Save the exported file in local system with any name we want.

Now to import the export file in target environment, connect the XrmToolBox with target Environment and connect to Portal Record Mover.
On portal record mover click on Import Record button to select the exported .xml package.
Select the file and click on Import to import the package.
This tool is easy to use for portal deployment.


What is Invitation in MS CRM Portal and How to Use it?

MS CRM Portal Security : Invitation

We know that the MS CRM or Power App Portal user is registered as Contacts in Dynamics.
In Dynamics will have existing contacts. If we want to make any existing contact to as Portal user then we can invite them. This is where Invitation feature of Portal comes into picture.

So, instead of these existing contact sign-up for portal user, we can send them invite with the link of portal and invitation code. The invitation code will allow them to sign-in on portal.

Create New invitation in Dynamics Portal Management:
Name: provide the name of invitation.
Type: Invitation can be created for Single and Group of contacts.
Expiry Date: Set Expiry Date of invitation (optional).
Inviter: It is contact which send email to invites.
If we select type as Group then a sub-grid will be display to associate the contact to which invitation will be send.
If we select Type as Singe then a lookup field will be displayed to select the single contact to which invitation will be send.
When Invitation will be redeemed then if we need to assign the contact to particular account or if we want to execute process (workflow) then we can set the value for the same.
When we create Invitation, by default Invitation code will be generated. However we can change it.

Send Invitation:
Invitation will be send to contact using existing workflow 'Send Invitation'.
Design of workflow which send invitation.
Entity is Invitation and it is Asynchronous process. 
In the steps, its first step is to encodes the invitation code.
Next it creates email message. This email message can be modified as we want.
The next sends the portal invitation. 
After portal invitation is send it changes the invitation status to Sent.
Email message in default configuration. We can modify the email by putting the portal, invitation code in email body.
To execute the Send Invitation Workflow, select flow at top ribbon menus. Send Invitation workflow name will display since it is designed as On Demand workflow.

Once the invitation code is received to contact. They try to sign-in in portal. They can use use Redeem Invitation to login. Copy the invitation code to the field.
Click on Register then it will change the contact to Portal User and  they can sign-in to portal.

Featured Posts

Download CRM 365 V9.X Tools using PowerShell

This configuration explains about how to download D365 utility tools step by steps. Step1 : Create a folder in your particular drive where y...

Popular Posts

Contact Me

Name

Email *

Message *